Is your old kitchen faucet an eyesore, or worse, leaking? The thought of professional installation fees can be frustrating. But you can do this upgrade yourself and save hundreds.
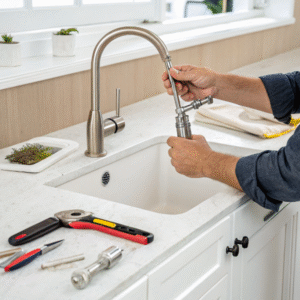
Yes, you can easily replace a kitchen faucet. It’s a straightforward DIY project that typically requires only a basin wrench or adjustable wrench. The process involves shutting off the water, removing the old faucet, installing the new one, and reconnecting the water supply lines.
I’ve spent over 20 years in the faucet manufacturing world, and I’ve seen it all. I’ve designed them, built them, and yes, installed more than I can count. I know that the thought of doing any kind of plumbing can seem scary. You imagine floods, complicated tools, and calling a plumber in shame. But I’m here to tell you that changing a kitchen faucet is one of the most rewarding and simple home improvements you can do. It’s a project that looks impressive but is surprisingly easy when you break it down. Let’s walk through the exact steps and questions you might have, so you can tackle this with confidence.
Can I replace a kitchen faucet myself?
Are you hesitating to replace your faucet because you think you lack the skills? It can feel risky, and the fear of causing a leak is real. But honestly, it’s a simple, rewarding task.
Absolutely. With modern faucets, this is a very beginner-friendly DIY project. Most quality faucet packages, like our Boosteel ones, come with everything you need. It’s a great way to save money and gain the satisfaction of improving your own home. You’ve got this.
In my experience, the biggest barrier for most people is just confidence. They see plumbing and think it’s some kind of dark art. It’s not. For a kitchen faucet, it’s mostly just screwing and unscrewing things by hand. In fact, you typically just need one small wrench to finish the job. When you open one of our faucet boxes, you’ll find the faucet itself, the hot and cold water hoses, and a set of mounting hardware like a rubber washer and a fixing nut.
Here’s the simple process I’ve walked friends through countless times:
- Feed the hot and cold hoses through their dedicated holes on the faucet body and tighten them gently.
- Place the faucet into the hole on your sink.
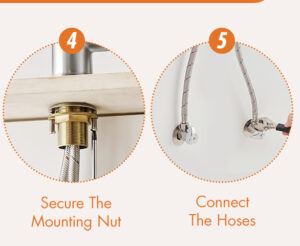
- From underneath the sink, slide on the rubber washer and then the fixing nut.
- Hand-tighten this nut, then give it a final quarter-turn with a wrench.
- Connect the other end of the hot and cold hoses to your water supply valves. Just hand-tightening is usually enough.
The whole thing takes about 20 minutes. Just like that, you’ve saved yourself up to $200 in installation fees. That’s a pretty good return for a little bit of your time.
What do I need to know before replacing my kitchen faucet?
Thinking of jumping right into the replacement? That can lead to frustrating problems like buying the wrong model or not having what you need. A little preparation makes the whole process smooth.
Before buying, check your sink’s hole configuration (one, three, or four holes) and the condition of your water supply lines under the sink. Also, test that your hot and cold water shut-off valves are working properly. This prep work prevents surprises.
Let’s dive deeper into what you need to check. Getting this right from the start is the key to a hassle-free installation. Think of it as your pre-flight checklist.
Pre-Installation Checklist
| Item | What to Check |
|---|---|
| Hole Configuration | Look at your sink. How many holes are there for the faucet and accessories? Most modern faucets use a single hole. If you have three, you can use a deck plate (escutcheon) to cover the extra ones for a clean look. We include these in many of our faucet kits. |
| Supply Lines | Look at the hoses connecting your old faucet to the wall valves. Are they kinked, rusty, or brittle? If they look old, now is the perfect time to replace them. Most new faucets come with integrated supply lines, which simplifies things. |
| Shut-off Valves | These are the small handles on the pipes coming from the wall. Turn them clockwise. Do they shut off the water completely? Are they hard to turn or leaky? If they are faulty, you may need to replace them first, which is a slightly bigger job. |
| Workspace | Clear everything out from the cabinet under your sink. You’ll need as much room as possible to work. Lay down an old towel and grab a bucket and a flashlight or headlamp. It will make your life much easier. |
Taking ten minutes to check these things can save you hours of frustration or an extra trip to the hardware store. It’s a step I never skip.
Can I replace a kitchen tap myself?
Does the word "plumbing" sound messy and complicated? You might be worried about causing a leak or breaking something important under the sink. But really, changing a tap is just unscrewing and screwing.
Yes, you can. Replacing a kitchen tap is a simple mechanical job. It involves shutting off the water, disconnecting the old lines, unscrewing the old tap, and then doing those steps in reverse with the new one. No special plumbing skills are needed.
Let’s break down the physical steps. I want you to see that this isn’t complex. It’s a logical sequence that anyone can follow. I remember helping a family friend who was so nervous about this. After we finished in under 30 minutes, he couldn’t believe how easy it was.
Here is the play-by-play for removing the old and installing the new:
- Shut Off the Water. This is rule number one. I’ll cover it more next, but turn the valves under the sink clockwise until they stop.
- Relieve Pressure. Turn on the old faucet handles to let any trapped water drain out into the sink.
- Disconnect. Place your bucket underneath. Use your wrench to loosen the nuts connecting the supply lines to the shut-off valves. Some water will drip out; that’s normal.
- Unscrew the Old Faucet. This is the trickiest part. You need to unscrew the mounting nuts holding the old faucet to the sink. A basin wrench is a lifesaver here, as it’s designed for this tight space.
- Remove and Clean. Lift the old faucet out from the top. Now, clean the sink surface thoroughly. Get rid of any old plumber’s putty or mineral buildup.
- Install the New Faucet. Follow the simple installation steps I mentioned earlier. Feed the new faucet through, tighten it from below, and connect the new supply lines to the valves.
That’s it. You’re just reversing the process. Take it one step at a time, and you’ll be done before you know it.
Do I need to shut off water to replace a kitchen faucet?
You’re ready with your new faucet, but what about the water? Ignoring this step could lead to a massive, watery disaster and serious damage. Luckily, preventing this is very simple.
Yes, absolutely. This is the first and most important step. Before doing anything else, you must completely close the hot and cold water shut-off valves under your sink. This is a non-negotiable safety measure to prevent a flood in your kitchen.
Over my 20+ years in this business, the biggest installation horror stories I’ve heard all start the same way: "I thought I could do it quickly without turning off the water." Please, don’t make that mistake. It turns a 20-minute job into an expensive disaster.
Here is what you need to do:
- Locate the Valves: Open the cabinet under your sink. You should see two pipes coming out of the wall, each with a small handle or knob. These are your shut-off valves, also known as angle stops. One is for hot water, and one is for cold.
- Turn Them Off: To close the valves, turn the handles clockwise. Remember the phrase "righty-tighty, lefty-loosey." Turn them until they are snug and won’t turn anymore. Do this for both the hot and cold valves.
- Test Your Work: After you’ve closed both valves, lift the handle on your old faucet to the "on" position. A small amount of water might trickle out, but it should stop completely within a few seconds. If water continues to run, your valves are not working properly, and you may need to shut off the main water supply to your house.
This single action is the most critical part of the entire process. It ensures a safe, dry, and stress-free installation.
Conclusion
Replacing your kitchen faucet is a simple DIY project. It will save you money, give your kitchen an instant upgrade, and provide a great sense of accomplishment. You can do it.


